Astronomy Insights
Lunar and Planetary Imaging Using Stellarvue APO Refractors
By Ralph E. Taggart
The Hogsback Observatory
Mason, MI
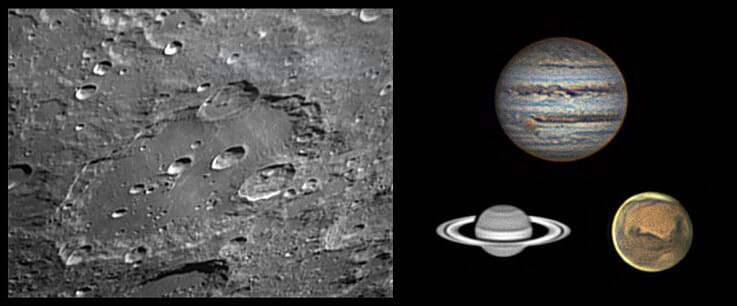
A sample of planetary and Lunar images acquired with my SV115 APO. The lunar image covers the Clavius complex, while Jupiter and Saturn indicate the relative size of the images you can acquire near the opposition for each planet. Mars is 50% larger than expected because some of the processing software (AS!) has the option of doing a 150% enlargement during processing if you had exceptional seeing.
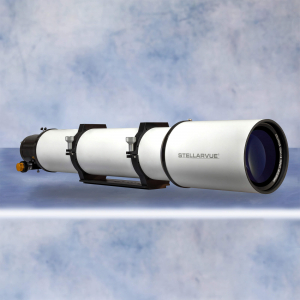
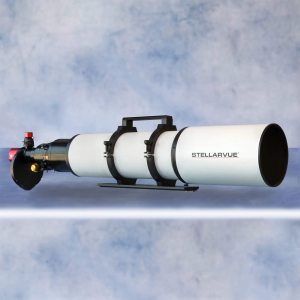
There is something about a finely crafted refractor that can infatuate the most jaded astronomer. The elite examples of the genre, triplet apochromatic (APO) instruments in the 100-130 mm aperture range, are incredibly versatile. Most are highly portable, have superb color rendition and contrast, are well suited to both planetary and deep-sky visual work, and excel at deepsky, full-color imaging with dramatic fields of view. Their construction assures that the internal optical surfaces remain pristine, tube currents are unlikely, and, barring rough handling, the instruments should never require collimation.
The one major activity that is never suggested by the "experts" is using high- Strehl refractors for lunar and planetary imaging. The reason is simple and seems logical – the nearer planets are small and getting a reasonable image scale to yield and detail requires long focal length, quite beyond those of contemporary refractors. In the world of refractors, long focal length means long telescopes, so today's instruments are recommended for wide-angle deep space imagery. At one level, this short-coming (not a bad pun) is quite obvious (see Figure 1). The image on the right was obtained with an Orion Optics (U.K.) high-Strehl Maksutov with a native focal length of 4,000 mm (~13 feet!). The image scale is quite satisfactory as is the planetary detail. To the left is an image of Jupiter captured with a Stellarvue SV115 (native fl of 800 mm), which renders the largest planet of the solar as something on a charm bracelet! Given the scarcity of high-quality 13-foot-long refractors in today's market, planetary imaging by the average amateur is reserved for long focal length, but compact, compound telescopes.
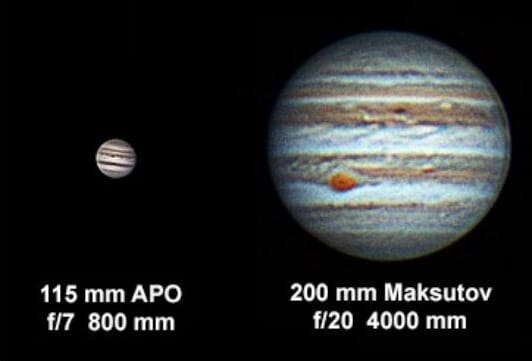
Figure 1. Image size is largely a matter of focal length, as illustrated by the Maksutov (native fl = 4,000 mm) and a Stellarvue SV115 (native fl = 800 mm).
It was the Stellarvue SV115 that first got me interested in planetary imaging and it is still my favorite telescope, even though I moved on to Maksutovs with their long focal lengths and relatively high contrast. I had a fine run over the past five years with the big Mak, but I never forgot the stunning views with the SV115! At age 82, I finally decided that I would like to see if those magnificent APO objectives coming out of Vic's shop could actually be used for serious planetary and lunar imaging. “Serious” is not the same thing as “Professional”, but it implies that you can send planetary images off the ALPO galleries and show your work off at local club meetings with your head held high. What's more, it is easy and not at all costly!
Over the years I settled on an effective focal length of 3,000-4,000 mm to provide the optimum image scale and detail when using high-Strehl instruments with 180 to 200 mm aperture. Much of what follows will deal with refractors in the range of 700 to 1,000 mm (focal length), All the Stellarvue refractors (and anyone else's as well) have a fixed or “native” focal length determine by the objective lens and will require enhancement of the effective focal length using Barlow or Powermate (a Trademark of TeleVue) lenses.
What You Will Need
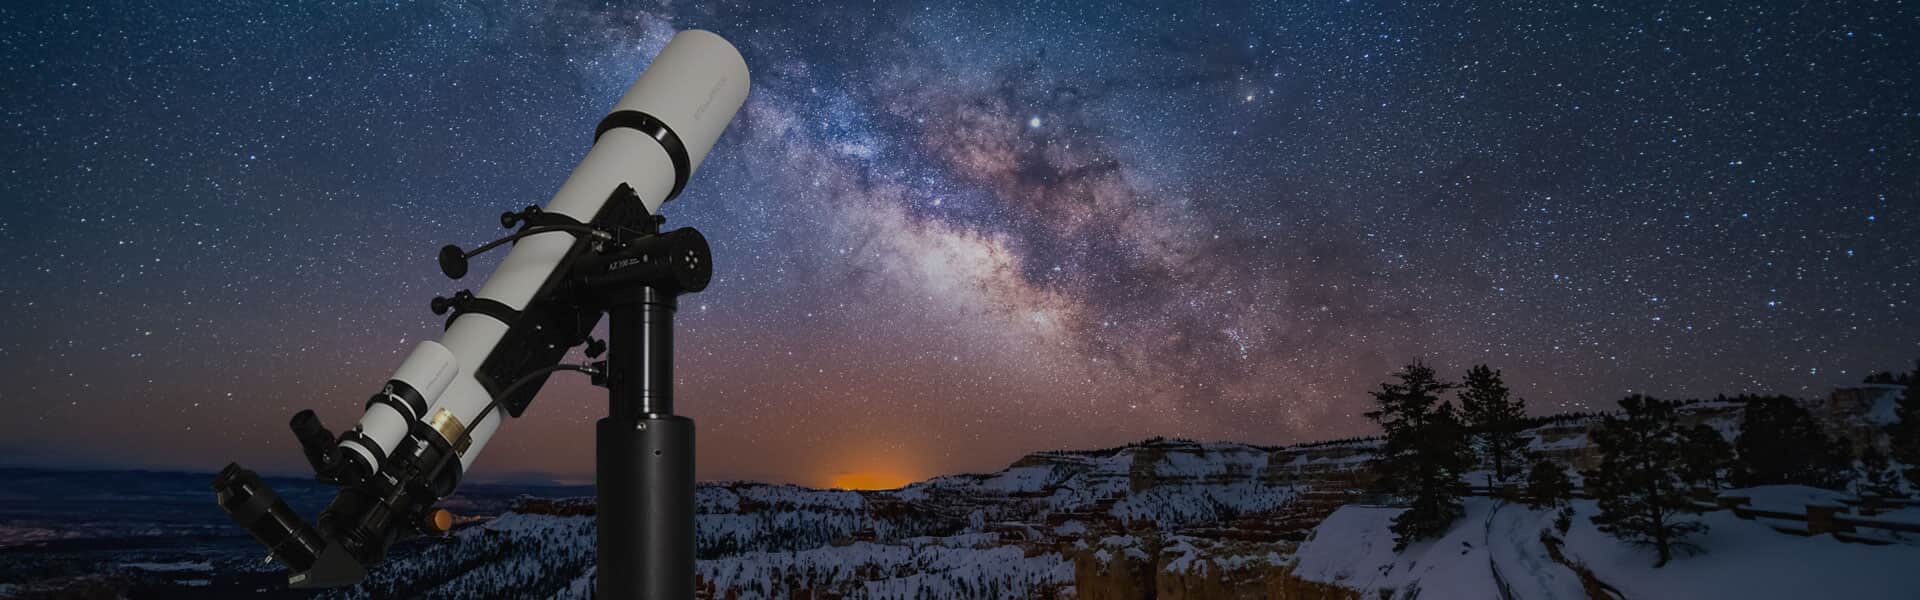
I will start by assuming you have a mount/with an electrical drive for your APO. If not, you will have to buy or borrow one and learn how to use it. As far as supplemental lenses are concerned, I have a world-class collection of Barlow and PowerMate lenses that I have used with a wide range of telescopes. You don't need such a collection, simply one specific Barlow and a simple extension tube: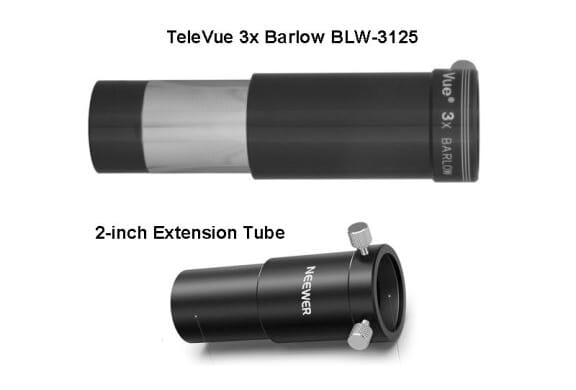
Figure 2. Image size is largely a matter of focal length, as illustrated by the Maksutov (native fl = 4,000 mm) and a Stellarvue SV115 (native fl = 800 mm).
Quite simply, I chose the TeleVue Barlow for its optical quality. Why a 3x Barlow? Simple - any smaller value is too small, and a 5X PowerMate is too much magnification. The purpose of the extension tube is to provide a small boost of magnification. Quality optics are not an issue as there are no lenses in the tube. Orion used to have one (05123), but it is missing from their current catalog. No problem, as the newer unit shown above is available from Amazon. Three variations are listed. You want the one that is 90 mm long – it will set you back about $17 and is way ahead of the Orion in terms of quality. Table 1 shows the impact of the Barlow and extension tube.
You will notice that our 3x Barlow actually is providing 3.4x of magnification. All Barlows and PowerMates will show an increase similar to this when used with a camera instead of an eyepiece. These lens modules are projection devices with the lenses in the base of the tube and the final magnification set by the length of the tube plus the eyepiece or camera. The magnification quoted in the specifications is the value with a typical eyepiece and will always be higher when imaging and provides a bit of the additional boost in effective focal length.
| Native focal length (M = 1) | 3x Barlow (M = 3.4x) | 3x Barlow + 2" extension (M = 4.4x) |
|---|---|---|
| 700 mm | 2380 mm | 3080 mm |
| 800 mm | 2720 mm | 3520 mm |
| 900 mm | 3060 mm | 3960 mm |
| 1000 mm | 3400 mm | 4400 mm |
| 1100 mm | 3740 mm | 4840 mm |
| 1200 mm | 4080 mm | 5280 mm |
Table 1. Effective focal length using a Televue 3x Barlow alone and in combination with a 2-inch extension.
Our “target” effective focal length is somewhere between 3,000 and 4,000 mm (indicated in green). Note that this can be achieved in telescopes with a native focal length between 900 and 1,200 mm by simply using the 3x Barlow. Adding the extension tube, we achieve the target for instruments with native focal lengths between 700 and 900 mm. Note that the effective focal lengths above 4,100 mm are shown in red. These are not recommended for routine imaging as you will have a high probability of issues in seeing and/or degraded resolution, but if you're seeing is good, it may be worth a try. If seeing seems poor (obvious image instability or having a difficult time with image focus, you can eliminate the extension tube. It will reduce your images to 77% of the size you would have obtained using the extension, but you should shave fewer “seeing” issues. Figure 3 illustrates how the Barlow and extension tube lets a high-Strehl APO function as a planetary telescope.

Figure 3. How your APO can join the ranks of “real” planetary instruments.
Image Alignment
At this point it is worth mentioning that this arrangement can also be useful when it comes to visual planetary or lunar observation. My accessory case has only two lenses - a 25mm Plossel with an illuminated reticle for centering and a 30mm Celestron Ultima that provides excellent planetary and Lunar viewing in conjunction with the 3x Barlow and extension tube. Whether imaging or just viewing, the first few attempts to get your target in the field of view with an effective focal length between 3,000 and 4,000 can be a trial. The easy way to achieve the desired alignment is a classic step by step in terms of increasing magnification:- Set up your telescope in the normal fashion and get the target in the field of view using your usual approach – an accurate GO_TO mount, a red-dot finder, or a classic finder scope.
- Using the targeting eyepiece, focus the image and center the target in the field of view.
- Remove the eyepiece, insert the Barlow and insert the targeting eyepiece into the open end of the Barlow. The target image, out of focus, should be in the field of view. Focus and center the target image.
- Remove the targeting eyepiece, insert the extension tube, followed by the targeting eyepiece, then focus and center again.
If your goal is visual observation, drop-in a 25-30 mm ocular and enjoy. If this is a prelude to imaging, it is time to trade the eyepiece for a camera.
What You Don't Need
You will not require electrical focus hardware for your telescope. The focus assemblies are first-rate on all Stellarvue models and every image in this guide is the product of old-fashioned manual focus.Lunar and Planetary Cameras
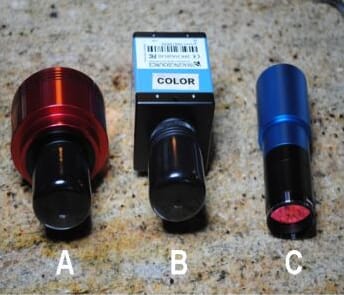
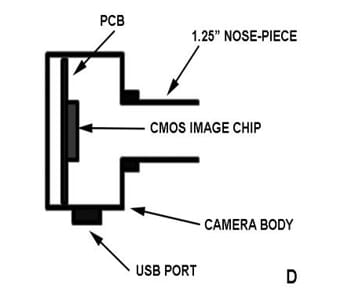
Figure 4. Some examples of planetary cameras ([A] an ASI290MC CMOS camera from ZWO Optical, [B] an older DFK31AU03 AS CCD camera from Imaging Source, and [C] an Orion Star-Shoot 1.2 MP CMOS camera.
The shape of the cases may vary, but the essential features are essentially the same. An interior printed circuit board (PCB) is populated with the components of the camera control circuits and the all- important camera sensor. Power and data to and from the computer via a standard USB port. A 1.25-inch nose-piece screws into the front of the camera. The light from the telescope objective passes down the nose-piece and onto the sensor.
The sensor array is the key element in the operation of the camera. When I first started imaging, the astronomical sensor scene was ruled by sensors with CCD pixel arrays. Gradual improvement in CMOS technology was such that few planetary cameras still use CCD technology. Today, most color imagery is done using “single shot” CMOS color sensors. The early approach to color imaging involved using a monochrome camera and a set of red, green, and blue filters. The target was imaged with the monochrome camera using each of the filters for a total of three images that were combined in later processing to create the color images. In theory, this approach provides slightly better resolution than “single shot” images, but it is tedious, takes more time, and requires additional equipment. The digital processing that creates images from single-shot cameras makes it virtually impossible to see the difference between the two approaches and is faster and less complex. CMOS sensors happen to be very sensitive to infra-red (IR) light and color cameras are typically equipped with IR blocking filters placed over the sensor or at the open end of the nose-piece (see Figure 6).
One feature that is worth checking when buying a camera is the size of the pixels. If the pixels have a relatively large diameter, the image of any given target will contain fewer pixels and the image, when processed, looks smaller than if the pixel size was reduced (see Figure 5). Smaller pixels can result in larger, more detailed images, but there is always a price to pay. Smaller pixels:
- Require more care in terms of focus.
- Since they intercept less light, they require proportionately longer exposure, which, as you will see shortly, can degrade image quality.
- The cameras tend to be more expensive because of the higher cost of the CMOS chips with smaller pixels.
- The added magnification means greater issues with respect to marginal “seeing”.
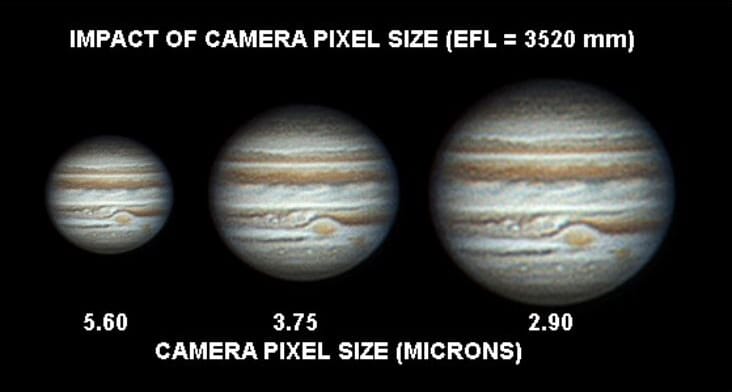
Figure 5. As the size of pixels on the sensor chip is reduced, the resulting images become larger as the images are comprised of a larger number of pixels.
Although this suggests the use of cameras with the smallest possible pixel size, things are a bit more complicated as you will see in the text. You are obviously free to make your own decisions, but I prefer cameras with pixels that are 3.75 microns in diameter.
Another factor is the size of the pixel array. Sensor chips for deep-space imaging have very large arrays to capture the greatest area in a given image, one of the things that make them expensive! Comparatively, planets only require a modest pixel array. It makes no sense to pay for pixels you don't need. Most capture software permits you to select smaller regions of interest (ROIs), which can speed up image acquisition and later processing. There is a wealth of free software options out there, so one thing you want to avoid is cameras that operate with only one dedicated piece of software. Such cameras may seem very attractive, but software diversity leads to better images. There is also no reason to pay more than about $200 for a fine single shot color camera for lunar and planetary imaging.
If I were in the market for a new camera, my choice would be the ASI224MC from ZWO Optical:
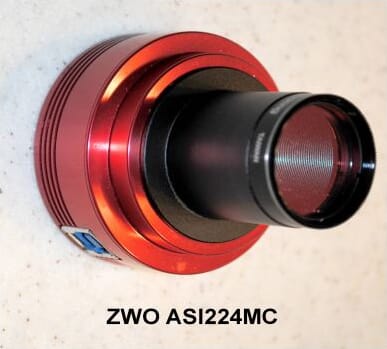
Figure 6. The ZWO ASI224MX single-shot color camera, with the supplied nose-piece installed and the ZWO IR Cut-Off installed on the threaded end of the nose-piece.
The camera has a 1305 x 977 array of 3.75-micron pixels. Current price from High Point Scientific is $199 and includes the camera body, a removable nose-piece, and a compatible USB cable. An IR Cut-Off filter is required and ZWO provides one for an additional $22. Of course, you may already have a suitable camera, or you may choose to make your own selection from the products out there. If you do so, it would be a good idea to review some of the camera specifications that have been discussed earlier.
The Tools of Lunar and Planetary Image Processing
Camera Function
Your camera can obtain individual images, but that is not how modern planetary imaging actually works. Instead, your camera is configured to function as a video camera. The average Jupiter exposure using my 115 mm SV115 is 50 mS, or about 20 images/second. I have set the camera to capture 2,000 images, which takes just 96 seconds. Those 2,000 frames are captured during approximately 0.1 degree of rotation (Jupiter completes one rotation ~every 10 hours), so rotation of the planet will have a minimal impact on the quality of the image set. Such extreme speed is not required is not a requirement for Mars, given its sedate ~25-hour rotation, but 2,000 frames is convenient. Saturn is much dimmer than either Jupiter or Mars, and the 2,000-frame set may require perhaps 0.2 degrees of the planet's ~11-hour rotation. Given the character of Saturn's rings and atmosphere, this is not a practical problem.The many required settings are enabled and/or executed by your image acquisition software. I use SharpCap 3.1 by Robin Clover and distributed by AstroSharp Ltd. A quick Web search will get you to a download site for this and all the other packages, all of which are freeware.
So, the sample taken by the camera is essentially a short video of 2,000 frames, where each of the frames, in the case of Jupiter, would look something like image Figure 7A:
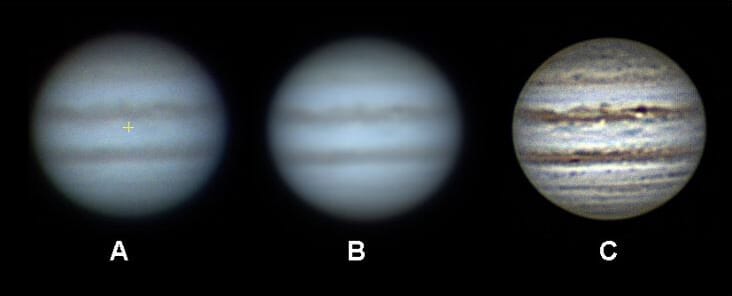
Figure 7. The major stages in the processing of lunar and planetary images. [A] a single frame of Jupiter, one of the 2,000 frames in the video. [B] A single PNG image incorporating the stacking of the 500 best frames. [C] The final image following four different operations on the previous PNG image.
Quality Sort and Stacking
Your video file contains 2,000 individual frames, none of which look precisely like the others. 2,000 is a reasonable sample, but your next step is to select some of the better examples out of the large pool. This can be accomplished with a program called AutoStakkert! (AS!) by Emil Kraalkamp. Any set of frames will have a bell-shaped curve with respect to image quality. AS! evaluates the entire set of frames (2,000 in my case) and selects a subset of the best frames (user selected, I always use 500 of the 2,00 in the raw video) and stacks the in the forms of a single PNG image ([B] in Figure 7). At this point you might think that our first processing did not achieve much (note slightly better contrast and a bit more brightness), but fear nor, real progress has been made.Miscellaneous But Critical Final Processing
RegiStax 6 by Cor Berrvoets (www.astronomie.be/registax) is a key piece of software that has made it possible to do effective lunar and planetary imaging with modest telescopes. It can do essentially all the necessary processing steps, but I think the quality sort and stacking are best done in AS!. However, RegiStax still has a lot to do. In the case of our APO images, the list of functions is modest but critical:- Red/Green /Blue Color Balance. RGB or White Balance can be set up in your image acquisition software (SharpCap in my case), but lets you tweak the balance to assure that you get accurate color rendition. “Proper Color” is something that even NASA can't decide on, but the point is, you can control the color component of your images.
- Registration of the Red, Green, and Blue Images. Ideally the atmosphere has let you generate images where the red, green, and blue image components are precisely aligned. The software can test your images and correct any misalignment. So far, I have not needed this option with my Stellarvue APO, but it has been handy when needed with other instruments.
- Wavelet Processing. Wavelet processing is the real treasure of RegiStax as it brings out an unbelievable amount of detail in the image (Figure 6C). Hard to believe, but easy to use.
This sounds very complicated, but learning is pretty simple and took me just 6 minutes to process the file leading to Figure 6! You can easily optimize the image in any photographic app (I use Adobe Photoshop Elements, definitely not freeware, but even something simpler would do the job).
Jupiter is certainly the easiest planet to image, given its size and lots of cloud details. However, it is not very productive to try files larger than 2,000 frames as planetary rotation will begin to soften the images. However, there is a piece of software (WinJUPOS by Grischa Hahn) that can solve the rotation problem. It can be downloaded for free (for non-commercial use) at www.jupos.org/gh/download.htm. I have been emphasizing files with 2,000 frames, but I always record four files in sequence that, after processing (all done in under 30 minutes) and I can use WinJUPOS to combine the four files, adjusting for planetary rotation. With a single file we have an image based on the best 500 frames, but by using WinJUPOS I have a final image based on the best 2,000 file from a total of 8,000 (Figure 8):
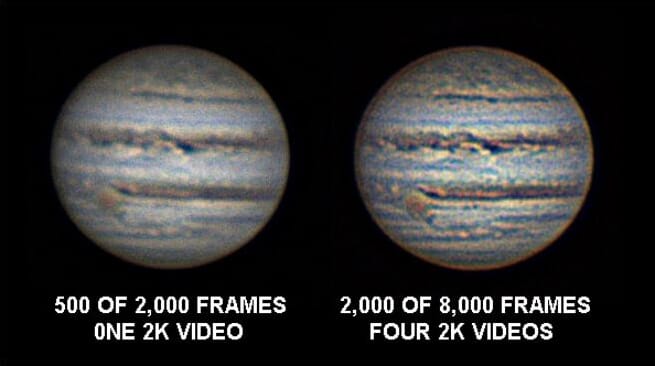
Figure 8. If the rotation of a planet like Jupiter can be eliminated as a variable, the more frames that can be combined, the more detailed will be the reconstructed image. The image on the right shows the result when processing a single video using 500 frames from a total of 2,000 frames in the video. WinJUPOS has the capability of merging multiple frames (four in this case) to take advantage of the improvement in the number of frames while removing the rotational component (right-hand image). Careful examination will confirm that the right-hand image is obviously superior to the image on the left. WinJUPOS has many other functions as well as a very useful ephemeris.
The costs of gearing up to do planetary work with an existing AP refractor are modest and all the required imaging and processing software is freeware. You will spend some time learning to use the software, but that can be done during all those days that you cannot get outside or into the observatory. I will be working on a quick-study acquisition and processing cook that should make things pretty easy.
Ralph E. Taggart
The Hogsback Observatory
Mason, MI
taggart@msu.edu
517-676-1207
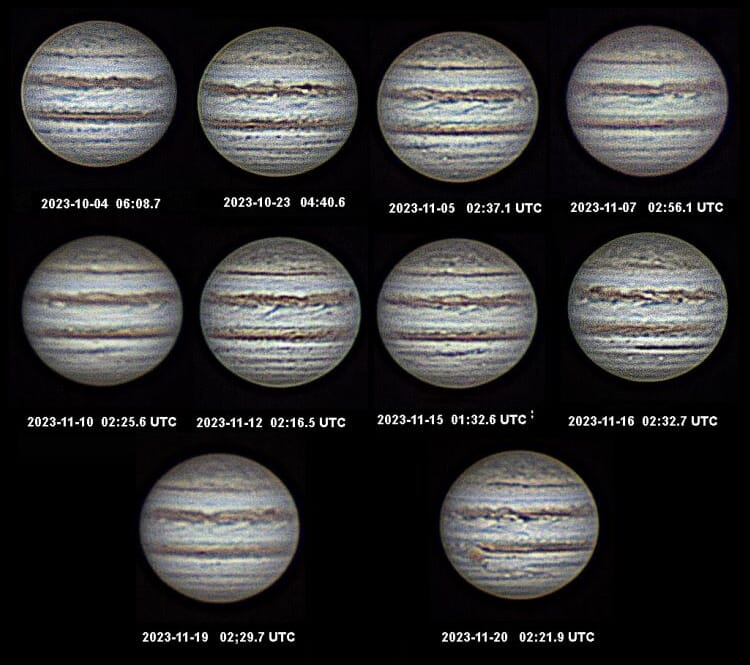
Figure 9. A record of Jupiter images on the only clear nights (ten in all) between early October through late November. Using a Stellarvue APO as a planetary instrument is not a matter of the occasional evening of perfect seeing. Michigan is one of the worst places in the country to do planetary imaging. We have fewer clear nights than Seattle, Washington and our seeing can be severely taxed by the fact that we are surrounded on three sides by the Great Lakes. Of the ten, eight are clearly very good to excellent. Only two nights (10 November and 19 November) show modest degradation. No instrument I have used has been more consistent. If you want to try your hand a Lunar and planetary imaging, your Stellarvue APO will deliver.


